You can access Wildix through a variety of devices, but the core of the service is through the Collaboration web page. This guide will show you how to log on to and use Collaboration.
Once your account has been created, you will receive an email invitation from Wildix PBX, no-reply@wildix.com.
If you don’t see it in your inbox check your junk mail as it may have been mis-filed there. If you still don’t see it, please contact us and we’ll be happy to re-send your login details; our contact details are at the bottom of every page.
This is an example of an invitation:

There is some key information in the email:
- Access to collaboration. This is the hostname of your phone service and always ends in “.wildxin.com”
- Login: This is your username
- Password: This is the password to use to log in to the Collaboration web page and the app
- Your Mobile, Office and Fax numbers, if set
- A link to the Google Chrome extension to which provides features like Click-to-Dial of any number you see in the browser
- A link to the app for iPhone and Android phones
1.2 Logging in to the web Collaboration
Note: The Collaboration interface works best under Google Chrome. For best results, download and run Chrome before proceeding to the next step.
Open Chrome, and enter your “Access to collaboration” as received in the invitation. If the browser responds that you should use HTTPS, agree and change to HTTPS
Next, you will be greeted with the Wildix login screen:

To log in, you can either enter the username and password provided in the invitation or, if your email is provided by Office 365 or G Suite, click the appropriate logo and log in using your Office 365 or G Suite account.
You will then be logged into Collaboration: 
1.2.1 An introduction to the top menu
Once you are logged in to Collaboration it is worthwhile running through the top menu:

1. Search field with speech recognition and call button: search for colleagues and contacts and perform quick actions from drop-down list: call, chat, send a fax/ Post-It etc:
2. Device selection: Choose the active device to place and answer calls using Collaboration. It can be a desk phone, the mobile app, Collaboration itself using a headset or any device.
3. More options: access to SMS / Fax / Post-It / Group chat dialog window: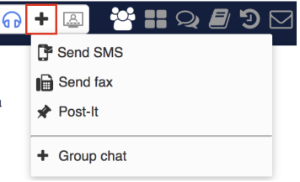
5. Other tabs of Collaboration:
- Colleagues:
- This is a list of your colleagues with presence status and geolocation
- Function keys: Buttons for the monitoring & management of colleagues + features. These are the same as the BLF keys on the phone.
- Note: this menu becomes visible only if you have configured these keys in Settings -> Function keys.
- Messaging: active chat sessions
- Phonebook: PBX shared and personal phonebooks
- History: Call history of calls faxes, notes, call recordings. This is syncronised across all your devices.
- Voicemail: access to Voicemail messages
- Web CRM: allows opening of a web application inside Collaboration.
- Note: this menu becomes visible only if you have configured it in Settings -> Personal -> Web CRM.
- Settings: user settings, call features, feature keys settings and more
- CDR-View access provides detailed call history for yourself and, if allowed, other members of the organisation
- Map view: geographical map with location of colleagues
- Edit your list of Colleagues
- Show / hide users that are offline
- Show / hide any Post-Its you have been sent
- Review and optionally clear you Post-It History
- Manage PBX, only available to administrators
- Screen sharing manager allows you to switch on/off the ability to share your screen
- Open Attendant Console to help those in a reception/call answering role
- Outgoing faxes: outgoing faxes queue
- Logout: exit Collaboration
- Help: link to the Wildix Collaboration guide
- Version: current WMS version
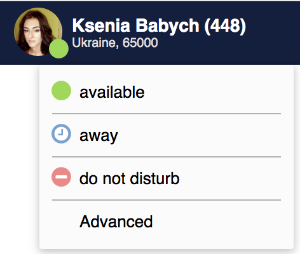
- User status and status message. You can quickly change your user status
- Click on your current user status
- Select a different user status from the list of available ones.
- To add an additional status message:
- Click Advanced
- Enter the status message into the field
- Click OK
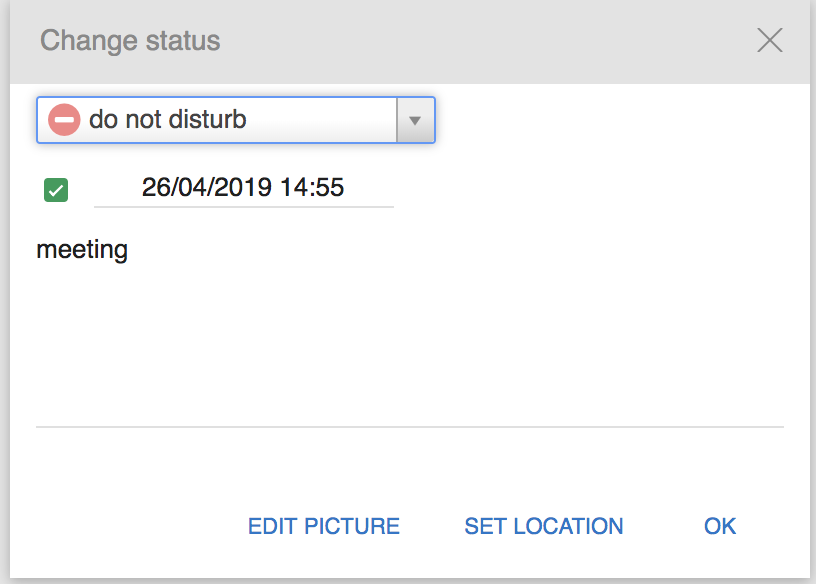
- To set up Do Not Disturb (DND) / Away status:
- Click Advanced
- Change your status to Away/Do Not Disturb
- Optionally enter a date & time of return and a message:
- User picture. Users who have not set up their user picture are displayed with initials by default. To set up / edit user picture:
- Click on your user status in the top menu
- Click Advanced
- Click Edit picture
- Choose an image to upload on your computer
- Resize the picture if necessary
- Click Save
- Geolocation. You are prompted to enable location sharing in your browser permissions, upon your first login to Collaboration. Check your browser settings to enable / disable location sharing. To manually set your geolocation:
- Click on your user status in the top menu and select Advanced
- Click Set location
- Select Custom to set up your location manually: enter the address into the field or move the red indicator (otherwise select Auto detect to enable the browser to automatically detect your location)
- Click Save
1.3 Using the Colleagues menu
People from the same department are automatically added to your group and displayed in Colleagues menu the first time you use it. Users can be subdivided by work teams (managed by the administrator). You can view all the users by clicking on All section or select a specific work team to view only its users.
The status of each user, along with their name and picture, are displayed for each colleague: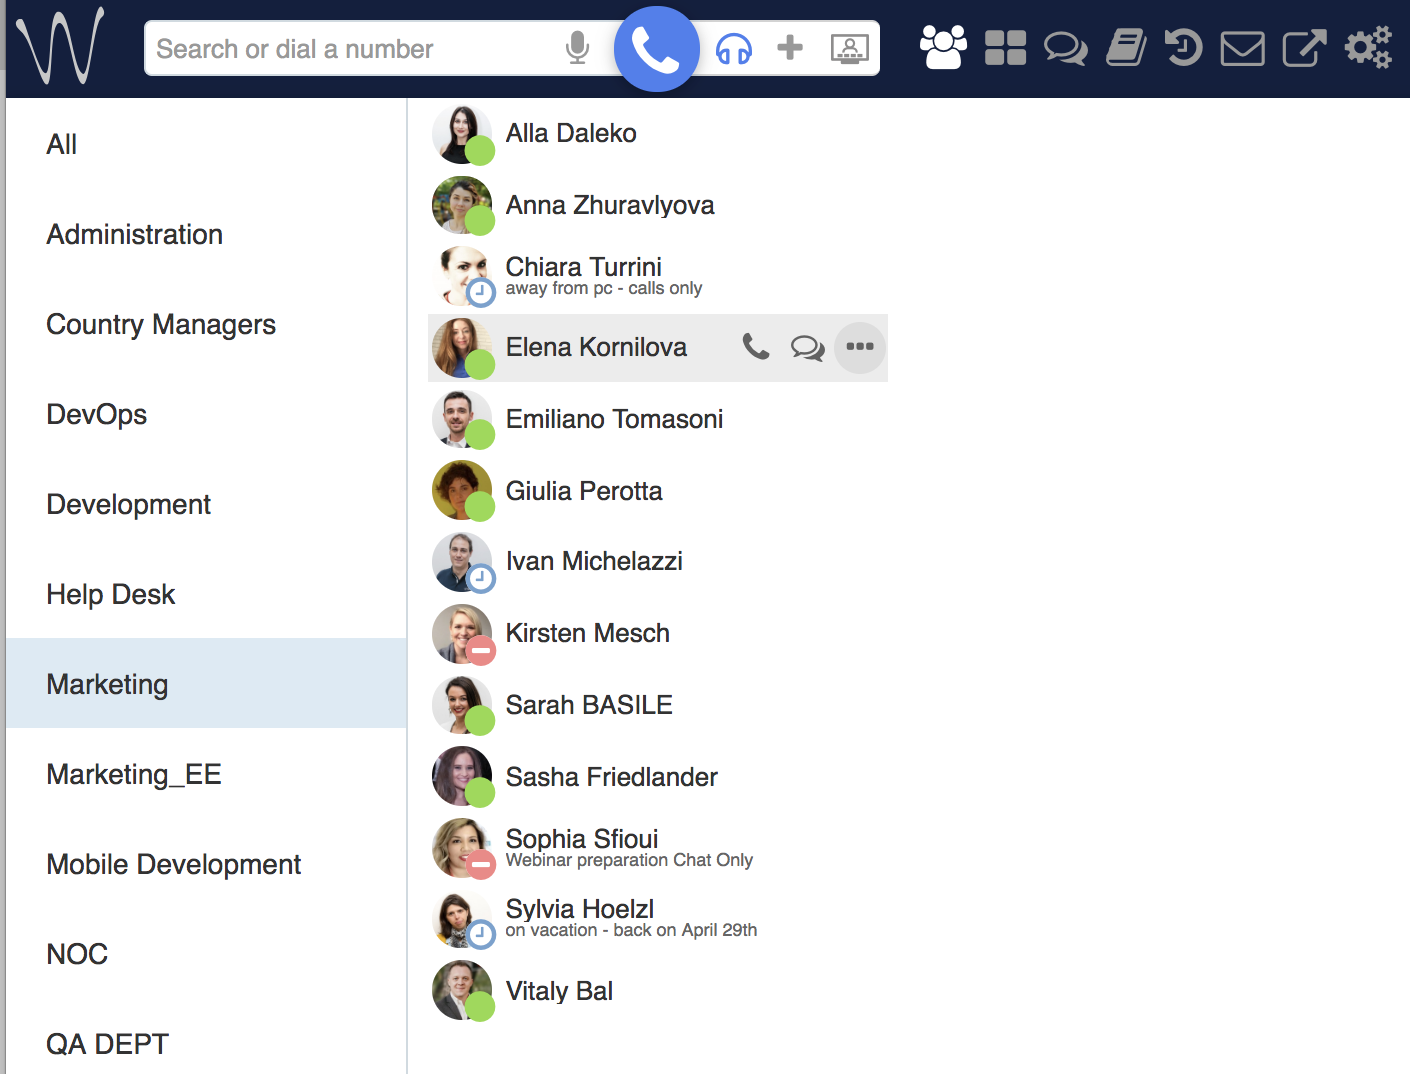
You can mouse over a colleague shows additional buttons with available actions:
- Call them
- Chat with them
- Send them a Post-It reminder
- Send them a Call me back request
To edit your colleagues list:
1. From the Other menu option in the top menu, select Edit Colleagues: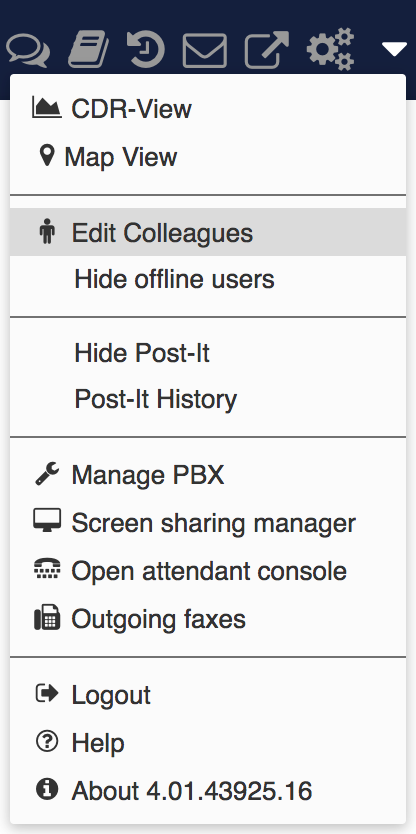
2. Select the colleagues (or work teams) that you want to add to your roster:
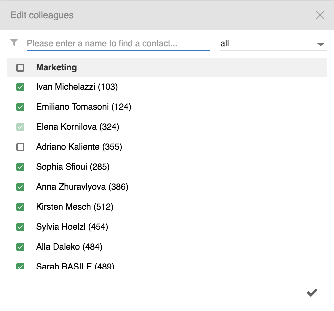
3. Click the Tick icon to save
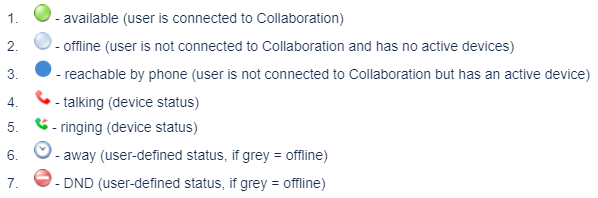
1.3.1 User status icons explained:
User status is synced over all Wildix devices registered to your account:
1.3.2 Call intrusion (barging)
If you have permission to barge a call, you can supervise the calls of others to assist in training or difficult situations.To Barge a call:
- Mouse over a colleague who is currently on the phone, click on Options button (three dots) and select Listen/ Barge/ Whisper. Or right-click on a colleague and select Listen / Barge / Whisper, where:
- Listen stands for silent intrusion. You can hear the parties but they cannot hear you.
- Barge - conference intrusion. You can hear the parties and they can hear you.
- Whisper - partial intrusion. You can hear the parties but only your colleague can hear you.
1.3.3 Call pickup / see who is calling
To see who is calling:
Go to the Colleagues tab and focus the mouse cursor on the user who has a ringing call / is talking on the phone (same option is available in Feature keys / Messaging tab)
To pick up a call:
- Go to the Colleagues tab
- Mouse over a colleague who has a ringing call, click on Options button (three dots) and select Pick up. Or right-click on a colleague and select Pick up:

1.4 Instant Messaging
Using Instant messaging you can send and receive messages, files and post-its to other users. This works on Collaboration and the mobile app so you are never out of touch. You can initiate an instant message session from many parts of Collaboration:
- From Search field:
Enter the colleague name/ extension and select Chat from the drop-down menu.
- From Colleagues / Feature keys:
Mouse over a colleague and click on Chat icon, or right-click on a colleague and select Chat - From History:
Right-click on a colleague and select Chat - From call dialog during a call:
Select Other -> Chat in call dialog (See Chapter: Call Management)
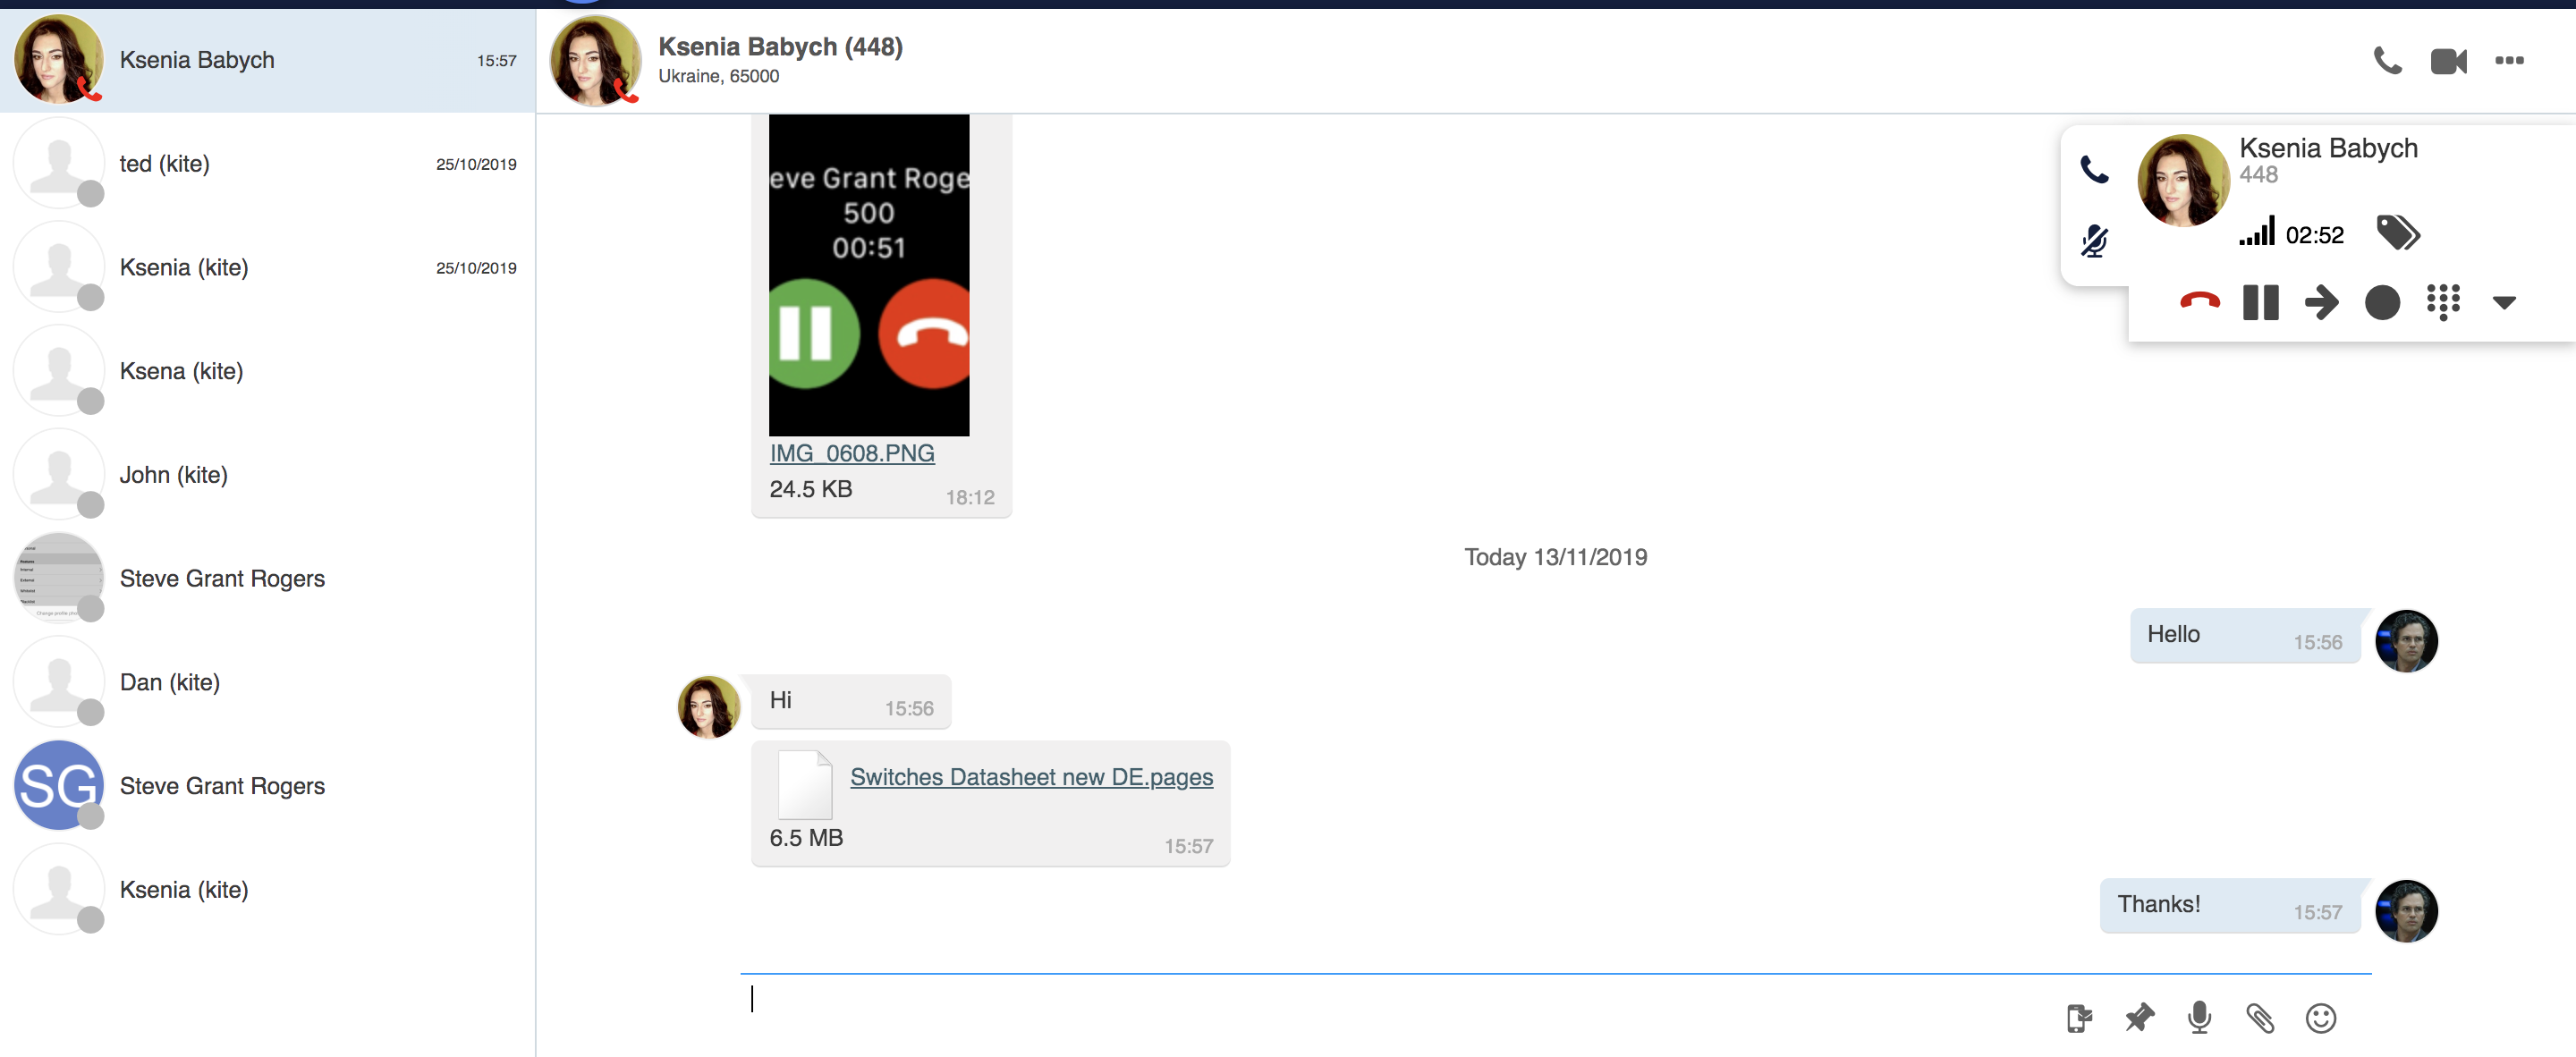
Once you have started an instant message session, the messaging tab opens and you can start typing your message and use chat input options:

- Click on the push pin to send the user a post-it reminder
- Click on the microphone to dictate your message
- Click on the paper clip to send a file or photo
- Click on the emoji to send an emoji
1.5 Calls and Call management
Collaboration presents you with a wealth of options for making, receiving and managing calls.
1.5.1 Choosing your active device for calls.
You can make and receive calls directly from Collaboration or from other devices registered to your account, including hardware phones, smartphone apps and mobility extension to your mobile phone. By default you will be set to use any phone to make and receive calls. Select the active device for making and receiving calls in the top menu:
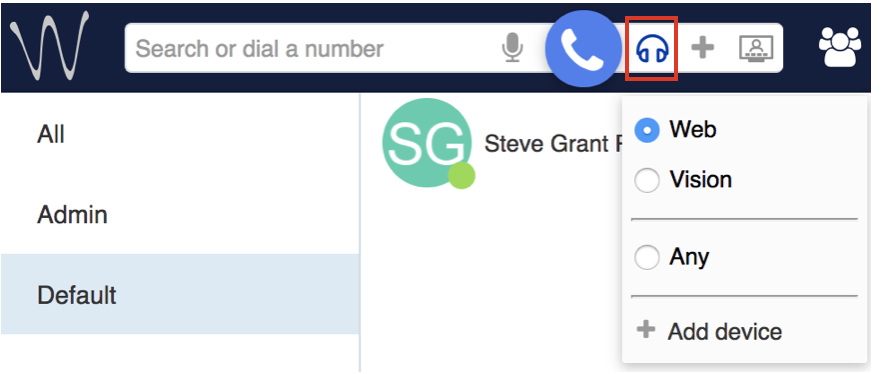
The list of options will vary depending on the devices and apps you have:
Supported devices:
- Web: make and receive calls directly from Collaboration
- WP480G, WelcomeConsole, Vision, SuperVision, W-AIR: Make and receive calls on hardware phones
- Wildix iOS/Android client: apps installed on smartphones
- Mobile number: mobility extension number of a user
- Any: All devices will ring on an incoming call. When using click-to-dial it will ring all devices
1.5.2 Making Calls
Before making a call, make sure the correct active device is selected in the top menu
There are many ways to make a call in addition to dialing the number on the phone:
- From search field:
- Enter the name or number and select Call: [number] from the drop-down menu:
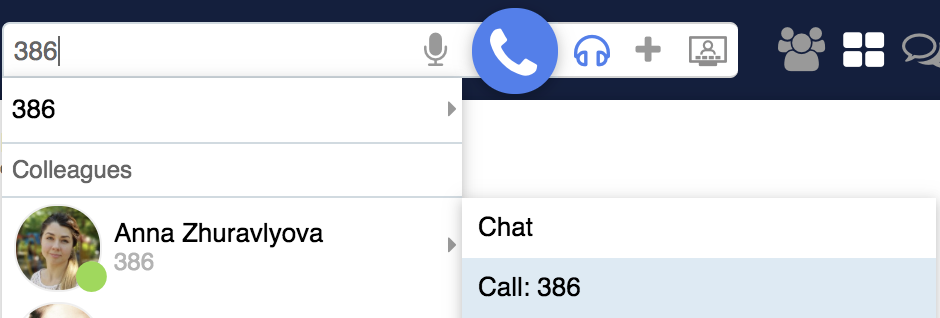
- It is possible to use speech recognition for search: click on the Microphone icon (make sure a microphone is connected to your PC or your PC has a built-in microphone) and start talking, the system automatically transforms your speech into text.
- Enter the name or number and select Call: [number] from the drop-down menu:
- From Colleagues:
- Mouse over a colleague and click on the Handset icon.
- Or mouse over a colleague, click on Options button (three dots) and select Call
- Or right-click on a colleague and select Call
- From Feature keys:
- Mouse over a colleague and click on the Handset icon
- Or mouse over a colleague, click on Options button (three dots) and select Call
- Or right-click on a colleague and select Call
- From Messaging:
- Click on the Handset icon in the upper right part of the chat session window
- Or mouse over a colleague, click on Options button (three dots) and select Call
- Or right-click on a colleague and select Call
- From History:
- Right-click on an entry and select Call / Call the mobile
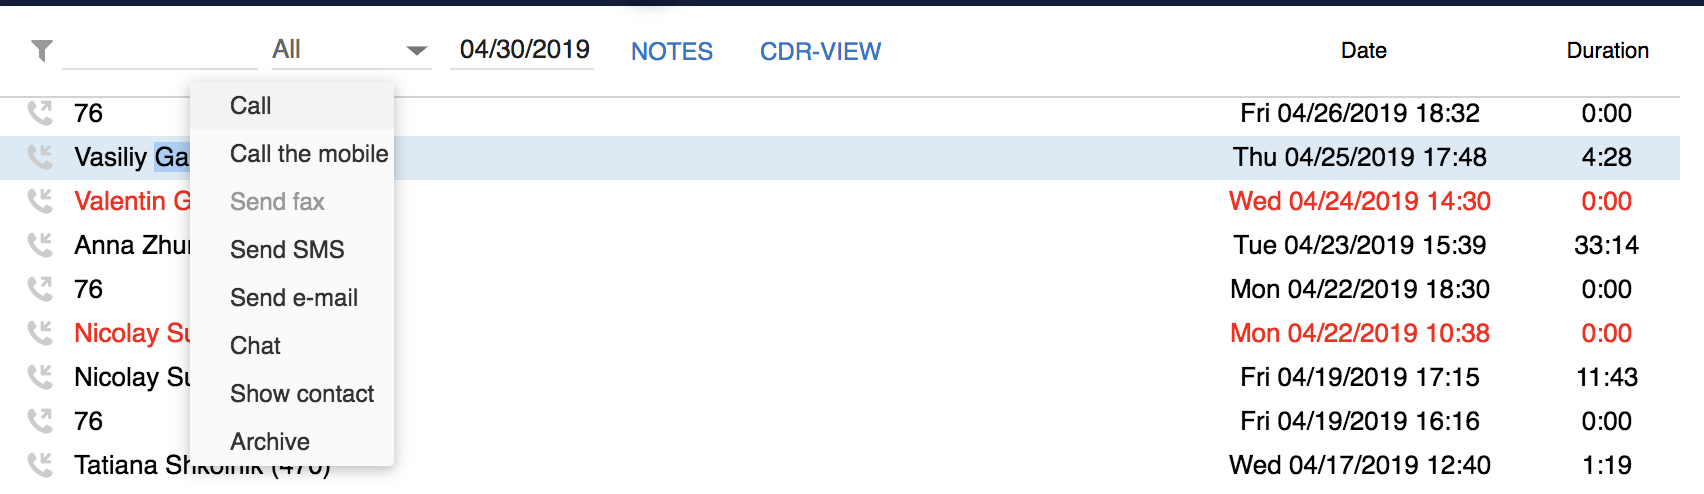
- Right-click on an entry and select Call / Call the mobile
- From Phonebook:
- Find a contact and click on the number you wish to call
- From Voicemail:
- Right-click on an entry and select Call
- Using Click-to-Dial:
- If you have the Chrome browser extension installed, right-click any number you see on a web page and choose Dail from the menu
1.5.3 Answering calls
In case you have several devices registered to your account, you can decide whether all your devices must ring, or only the active one. See section 1.5.1 - Choosing your active device for calls.
When a call comes in, a dialog window is displayed in Collaboration:
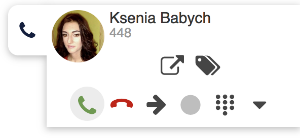
- To answer a call: click the green Handset icon
- To decline a call: click the Hang up (red) icon
- To forward a call without answering: click Arrow icon, select the contact to forward a call to (using search)/ or transfer a call to Voicemail:
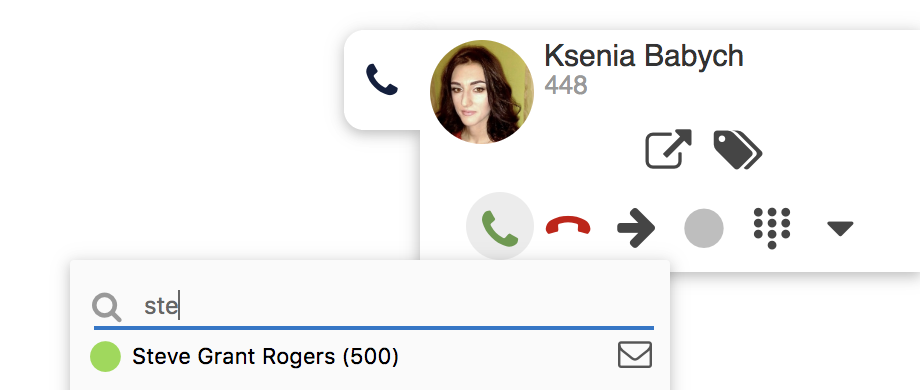
- You can set up automatic call forwarding based on user status (available, DND, away) and call type (internal, external, whitelist, blacklist). Ask support for more information.
1.5.4 Call Management
Once on a call, you can manage a call directly from call dialog window:
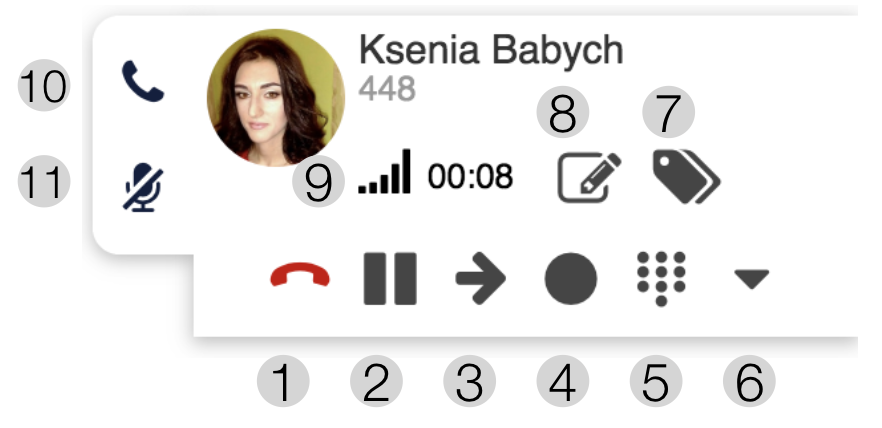
1. Hang Up
2. Hold/ resume
3. Transfer
4. Call recording
5. Dialpad / Send DTMF
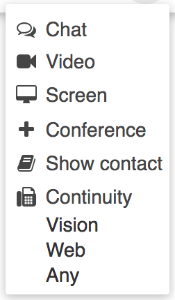
6. Other (expanded):
7. Add tags (See chapter: Setting tags)
8. Add notes, not available for calls between colleagues (See chapter: Contact notes)
9. Call quality (shown only in case of a single call)
10. Hide/ display a call dialog window
11. Mute/ unmute your microphone. Mute icon is crossed out by default (flashing when muted)
1.5.4.1 Hold / Second Call
Click on the Hold icon during a call to put a call on hold/ to resume a call. The second party hears music on hold. When you make / answer a second call, the current call is automatically put on hold. It is possible to swap between an active call and a call on hold by pressing the Hold icon (Hold icon is blinking in for the call which is currently on hold): 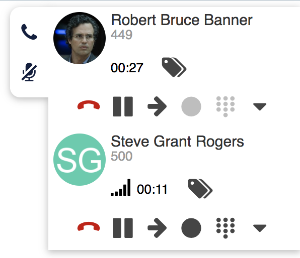
1.5.4.2 Switch active device during a call
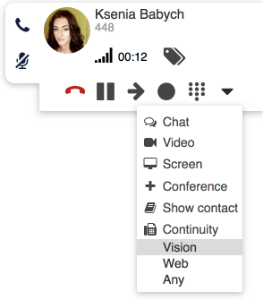
If you have more then one device registered to your account, you can move a call between them during a call using Continuity option in a call dialog window:
- Click Other -> Continuity and select the device you want to continue the call on
- The call is automatically picked up on the selected device:
- To switch the device back to Web, dial Feature Code *5
1.5.4.3 Call Transfer
To transfer a call to another user:
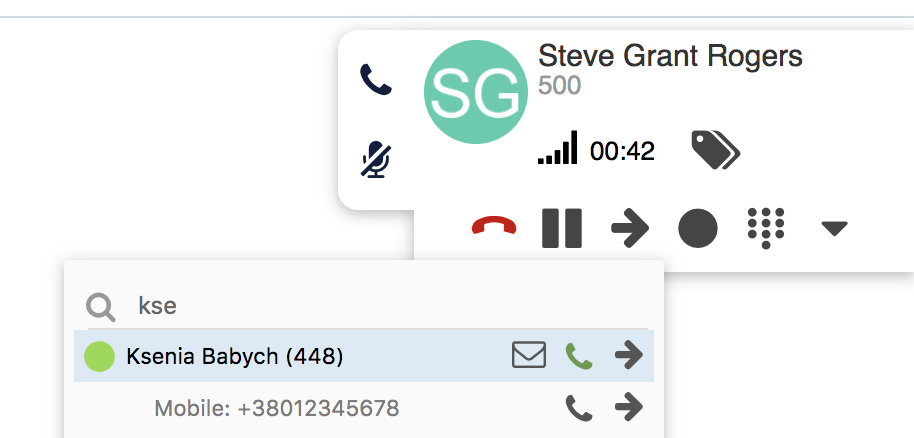
- During a call, click on the Transfer icon
- Enter the contact name/ number (user status and additional phone numbers are displayed).
- On the recipient’s details:
- Click on the Envelope icon to transfer a call to their Voicemail, the Handset icon to speak to the recipient before transfer (attended transfer) or the Arrow for blind transfer:
1.5.4.4 Drag & Drop Call transfer
Drag the Caller Name from the call dialog window and drop it onto the desired user in the Colleagues or Messaging tab.
1.5.4.5 Conference call
It is possible to add users to call conference via Wildix Collaboration:
- When you have two calls, click Other -> Conference from one of the call dialogs to merge calls
- To invite more parties: make a new call and click Conference from the call dialog window:

1.5.5 Video Calls
Video in Collaboration is fully supported on Chrome browser (WebRTC video). 2-way video is currently fully supported between Collaboration on Chrome and:
- Collaboration on Chrome
- Collaboration on Firefox
- Kite user on Chrome
- Kite user on Firefox
- Vision/ SuperVision
 |
Hello Comtec Support Tel: +44(0)1752 422950 email: support@hellocomtec.com web: https://hellocomtec.com fb: https://www.facebook.com/ tw: https://twitter.com/ |